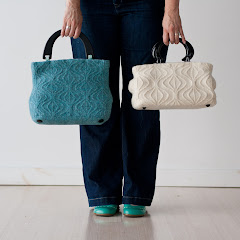
Am I really the only one struggling to sew the darn lining? Maybe my interfacing is too stiff, but trying to fit the sides together is a nightmare. Rethinking the pattern to see if I can find a way to make the lining easier to sew.
You know what? I totally get it. The instructions for this design call for a pieced lining, where each of the four vertical sides is measured, shaped, and cut to conform really closely to the shape of the finished, felted bag.
Along with a good stiff interfacing, this pieced lining helps give the bag enough structure to stand open on its own, and prevents things like your car keys and cell phone from getting lost in folds of loose fabric. But it's a fussy process to sew corners and angles and seams on both sides of narrow strips of interfaced fabric, and dagnabit, there's just gotta be an easier way that gives ALMOST the same results, right? I think so--and here it is.
Instead of doing a pieced lining for the Billington Bag, knitters who want a shortcut to the finish line can try a modified sack lining. Three measurements, two pieces of fabric and matching interfacing, five seams (three of which are completely straight!), and you'll be ready to insert it.
Step 1: Measure.
Take your felted bag and flatten it out as shown below--so the top edges are even and the bottom of the bag is folded more or less in half along its long axis. Measure the width at the top of the bag (A), the width at the bottom of the bag (B), and the height from the top opening edge to the folded bottom edge (C).
Step 2: Cut.
Cut two rectangles of interfacing that measure B x C. Cut two rectangles of lining fabric that measure (B + 1") x (C + 1"). Center the interfacing on the lining fabric; you'll have 1/2" margins all the way around. Baste or tack interfacing in place on the wrong side of the fabric.
Step 3: Sew.
With right sides of fabric together, seam the two sides and the bottom closed, leaving the top open, like a pillowcase.
Subtract A from B; divide the remainder by 2, and mark a point that far in from the side of the interfacing on the top edge. (For instance, if your bottom width (B) is 14" and top width (A) is 11", 14 - 11 = 3. 3 divided by 2 = 1.5, so you'll mark 1.5" in from the upper edge on both sides of the top.
If you're making the short version of the bag, fold it horizontally in thirds, and mark 1/3 of the way down on each side. Stitch a diagonal line from 1/3 down the side to the marked point on the upper edge, and trim away the excess, leaving 1/2" of lining fabric and trimming the interfacing very close to the stitching (1/8" or so). If you're making the tall version, do the same thing, but mark and stitch 1/4 of the way down the sides, instead of 1/3.
Now comes the tricky part (don't worry, it's not that tricky): Making the bottom of the lining flat! To do this, just put your hand inside the sack, down into one of the corners. Bring the side seam and the bottom seam together, pinching the corner flat. Sew straight across the flattened corner at the point where it's as wide as the inside bottom of your bag; repeat on the second side. (This is the same principle at work in paper grocery bags, so if you get lost and these caveman-level illustrations of mine are no help, take a look at the bottom of one of those!)
Step 4: Finish.
Tuck the triangular points under the bottom and tack in place, if you like (or just press them with under gently with an iron). Turn the upper edge of the lining fabric over the interfacing, insert the lining, and stitch to the upper edge of the bag. Done!


No comments:
Post a Comment