Thursday, May 29, 2014

Just released (finally!): Irma!

This is one of those designs that's been ALMOST ready to go for longer than I care to even think about. It's been waiting for those last few tweaks (pesky things like double-checking measurements and making schematics, which are my two least favorite parts of the technical editing process) for months and months and months on end. It's not all wasted time; in those same months, I've been field-testing (a.k.a. wearing all the time) the original prototypes, and have had a couple of friends test-knitting the original, non-schematic-ed, non-double-checked drafts and alerting me to minor errors and typos. And fortunately, the original photo shoot was done right around the same time of year as this, so maybe no one will look closely and see how many more crow's feet I have now. Without further ado, I give you... Irma!

CIMG2877


I attended a workshop with Deborah Newton at Vogue Knitting Live in LA a few years ago, which was well worth the price of admission. The fee included a copy of her then-new book Finishing School: A Master Class for Knitters, a welcome addition to my reference shelf, and Newton's own expertise and advice were invaluable! One of the many things I learned that week was that every knitter--young and old, experienced and novice--has their very own set of strongly held opinions about knitting, yarn, and everything associated with them. Deborah Newton, for instance, has near-religious convictions regarding seams in knitted garments--she's a big, big, big fan of 'em. In fact, she was so compelling on the subject of seams that I thought I'd go ahead and try designing a pieced-and-seamed cardigan myself, and Irma is it!

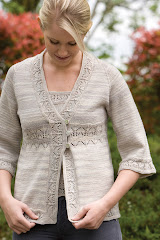
The Irma cardigan is a slightly airier, more feminine (if I can be gender-normative for a minute here) take on the shawl-collar sweaters all the hipster boys have traded their hoodies for as they've hit their mature (ha ha) years. It's worked in an allover columnar lace motif with deep ribbing at the cuffs and hem. And pockets, of course! I worked the original prototype, which is the jade green one shown above, in Simply Socks Yarn Company's solid wool/nylon "house blend." SSYC Solid is a yarn I really adore, not least for its springy plied texture, but also because it comes in, like, EVERY COLOR EVER. I also reknit the pattern, once it was (mostly) written, in Knit Picks Gloss Fingering in a dark gray color called Hawk. That yarn has a hint more luster and slightly crisper stitch definition, and makes the lace motif really pop. It also has an elegant drape in stockinette, thanks to its 30% silk blend, which helps the shawl collar roll while the button band lies splendidly flat, and that's why this yarn is another favorite of mine. (Yes, I have about forty-eleven different "favorite" yarns. Who doesn't?) Were I to make yet another one of these for myself--and I'm not ruling that out--I'd probably try a super-cozy and decadent winter version in Knit Picks Capretta, maybe in the Pesto colorway. But then, I'm a sucker for cashmere.

On the whole, I liked the seamed-garment experience. I learned to sew before I learned to knit, so on a fundamental level, the concept of taking flat pieces and building a garment out of them makes every bit as much sense to me as taking a strand of fiber and building it, stitch by stitch, row by row, into a shape that fits a body (or a hand, or a foot,  or what have you). For Irma, I used the crocheted-seam technique Newton demonstrated at the workshop and describes in her book; it was really fun to work, and I think I'll probably continue to use it for shoulder seams in preference to a three-needle bind-off. For one thing, it's easier to unwork and rework if you need to (if you've ever dismantled a thrift-shop sweater to recycle the yarn, you've probably already unworked a crocheted seam!). It also adds a skosh more structure to one part of a garment that really needs reinforcing, while still being flexible and elastic. And because it does use rather more yarn than a mattress-stitch seam or three-needle bind-off, you can even cannibalize it in a pinch if you need a foot or two of yarn to darn or patch a very well-worn garment. Unlike reserved leftover yarn, yarn transplanted from a seam will match the repaired area perfectly, since it's been laundered the same amount as the rest of the garment--so it's kind of a rainy-day account for your sweater! Which is good, because now that other people can actually knit this design for themselves, I'm halfway to wearing the prototpyes out.

Friday, May 2, 2014

Taking it down a notch

Sometimes you want a challenge; other times you just want things to be easy, and successful, and foolproof, and DONE. A Raveler posted a really good question recently on the pattern page for the Billington Bag:

Am I really the only one struggling to sew the darn lining? Maybe my interfacing is too stiff, but trying to fit the sides together is a nightmare. Rethinking the pattern to see if I can find a way to make the lining easier to sew.

You know what? I totally get it. The instructions for this design call for a pieced lining, where each of the four vertical sides is measured, shaped, and cut to conform really closely to the shape of the finished, felted bag.


Along with a good stiff interfacing, this pieced lining helps give the bag enough structure to stand open on its own, and prevents things like your car keys and cell phone from getting lost in folds of loose fabric. But it's a fussy process to sew corners and angles and seams on both sides of narrow strips of interfaced fabric, and dagnabit, there's just gotta be an easier way that gives ALMOST the same results, right? I think so--and here it is.

Instead of doing a pieced lining for the Billington Bag, knitters who want a shortcut to the finish line can try a modified sack lining. Three measurements, two pieces of fabric and matching interfacing, five seams (three of which are completely straight!), and you'll be ready to insert it.

Step 1: Measure.

Take your felted bag and flatten it out as shown below--so the top edges are even and the bottom of the bag is folded more or less in half along its long axis. Measure the width at the top of the bag (A), the width at the bottom of the bag (B), and the height from the top opening edge to the folded bottom edge (C).


Step 2: Cut.

Cut two rectangles of interfacing that measure B x C. Cut two rectangles of lining fabric that measure (B + 1") x (C + 1"). Center the interfacing on the lining fabric; you'll have 1/2" margins all the way around. Baste or tack interfacing in place on the wrong side of the fabric.

Step 3: Sew.

With right sides of fabric together, seam the two sides and the bottom closed, leaving the top open, like a pillowcase.

Subtract A from B; divide the remainder by 2, and mark a point that far in from the side of the interfacing on the top edge. (For instance, if your bottom width (B) is 14" and  top width (A) is 11", 14 - 11 = 3.  3 divided by 2 = 1.5, so you'll mark 1.5" in from the upper edge on both sides of the top.

If you're making the short version of the bag, fold it horizontally in thirds, and mark 1/3 of the way down on each side. Stitch a diagonal line from 1/3 down the side to the marked point on the upper edge, and trim away the excess, leaving 1/2" of lining fabric and trimming the interfacing very close to the stitching (1/8" or so). If you're making the tall version, do the same thing, but mark and stitch 1/4 of the way down the sides, instead of 1/3.

Now comes the tricky part (don't worry, it's not that tricky): Making the bottom of the lining flat! To do this, just put your hand inside the sack, down into one of the corners. Bring the side seam and the bottom seam together, pinching the corner flat. Sew straight across the flattened corner at the point where it's as wide as the inside bottom of your bag; repeat on the second side. (This is the same principle at work in paper grocery bags, so if you get lost and these caveman-level illustrations of mine are no help, take a look at the bottom of one of those!)
Step 4: Finish.

Tuck the triangular points under the bottom and tack in place, if you like (or just press them with under gently with an iron). Turn the upper edge of the lining fabric over the interfacing, insert the lining, and stitch to the upper edge of the bag. Done!