Thursday, December 18, 2014

Detective work: The case of the mystery handknit

Not a lot of posts lately, folks...I've had a pretty wicked case of start-itis, so haven't had a lot of finished projects or new designs to post about. I've also been trying to prioritize work on my dissertation over more "recreational" writing projects. But I wanted to squeeze in at least one last howdy for 2014, and send some holiday-and-new-year best wishes your way!

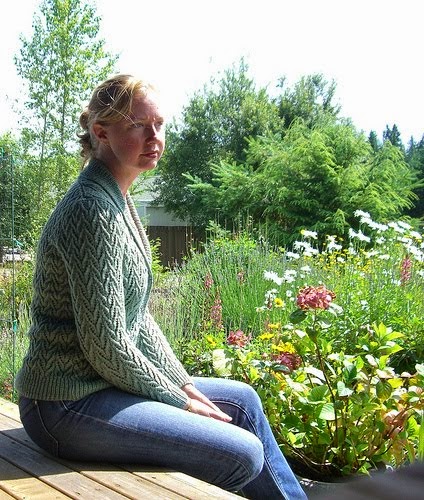
Since my dissertation deals with evidence in a law enforcement context, I'll get around my prohibition on extracurricular writings by framing this post as a bit of detective work--forensic analysis of fiber evidence, to be exact. :-) Here's the body in question; you'll have to imagine the chalk outline for yourself...

image

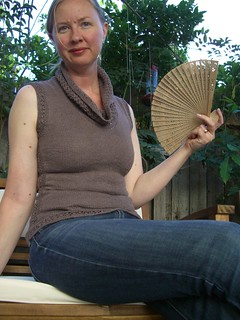
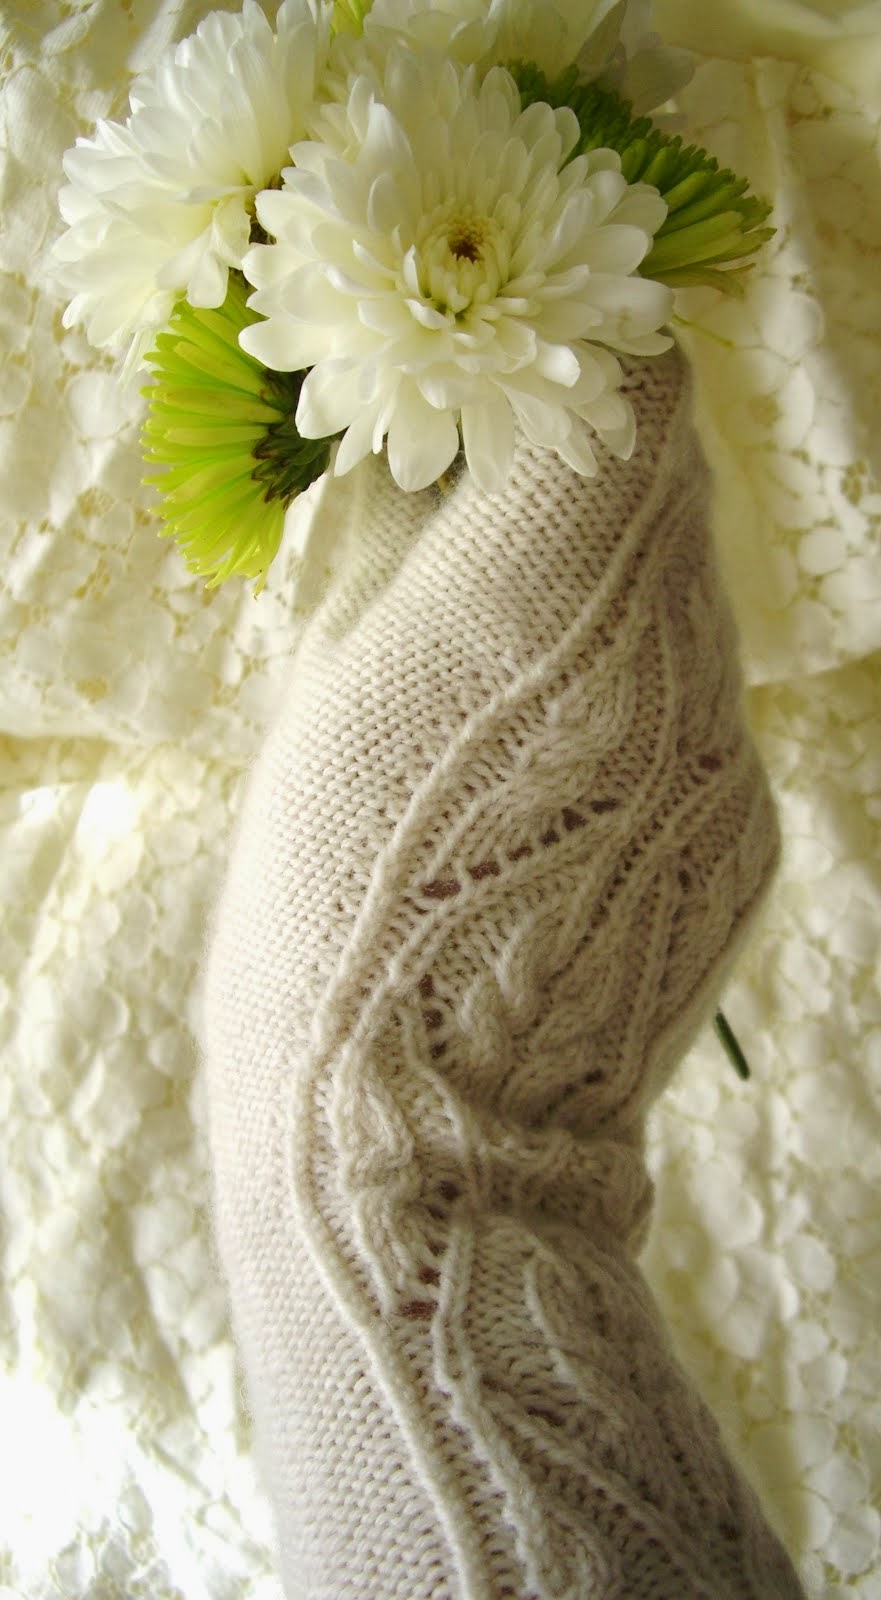
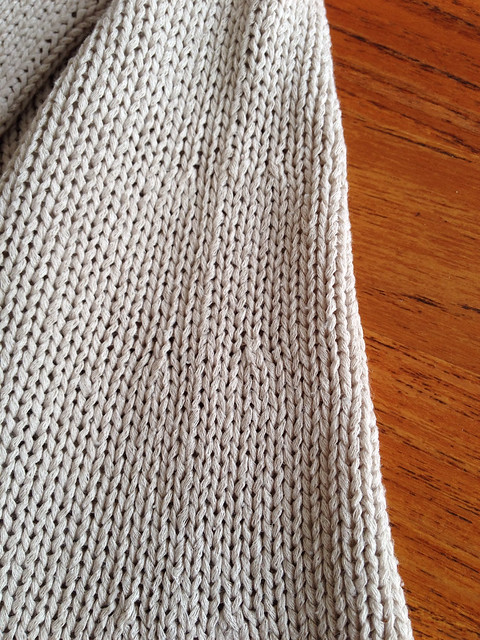
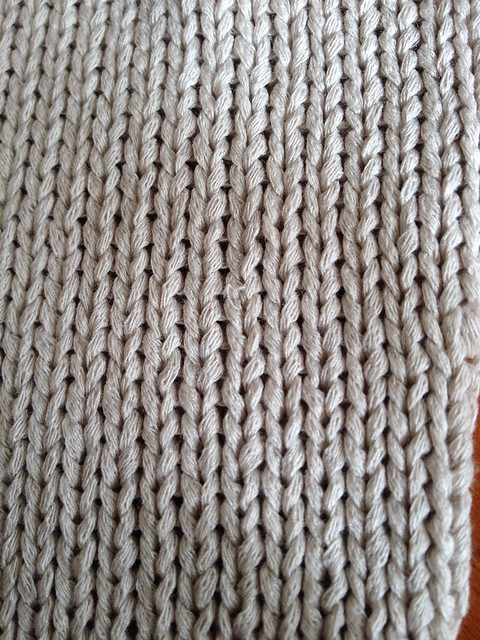
My good friend T. was wearing this sweater when she came over for dinner the other night, and I kept staring at it. It has a strong Eileen Fisher vibe, with its neutral oyster hue, simple lines, and elegant drape. It's far from fancy in construction--mostly stockinette with two simple rows of purled edging at the cuffs and hem--but there were little details, such as the shaping at the waist, shoulder, and neckline, that drew my eye as a knitter. "I think your sweater might be handmade!" I eventually blurted to T. She told me she'd picked it up in a local (LA) thrift shop, twisting around to demonstrate that it didn't have a label in the back neck. When she left that night, she very gamely let me hang onto it for a more detailed forensic analysis, which deepened my initial suspicions.


image

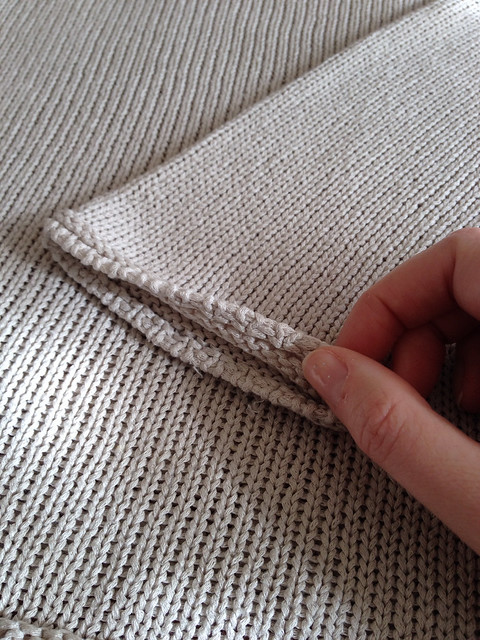
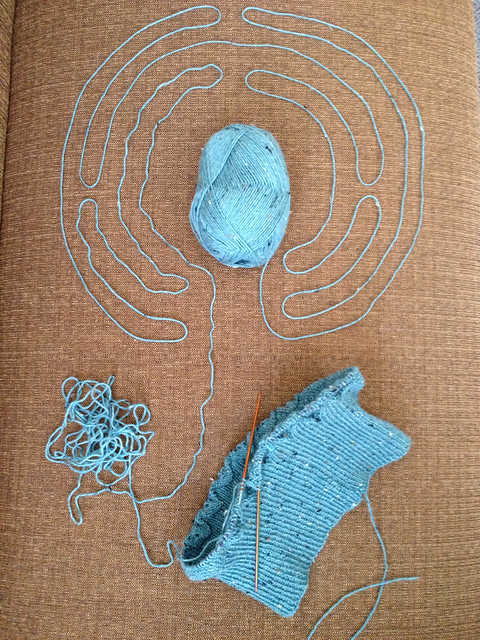
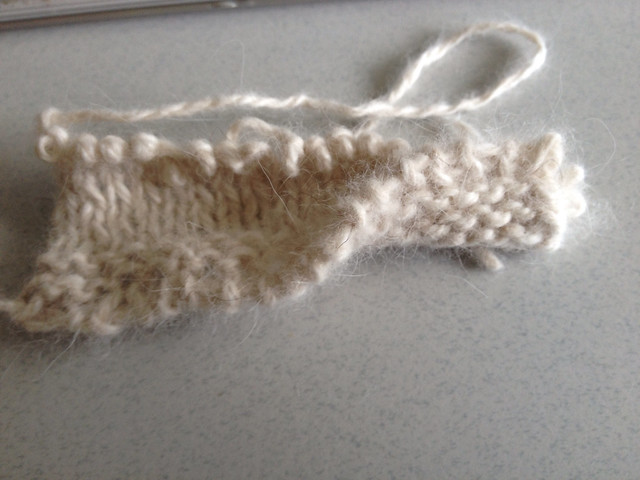
Clue number one: The cast-on. My first impression was that this sweater had been worked seamlessly from the bottom up, so I started by checking out the hems of the body and sleeves, and discovered that they had an unusual-looking cast-on edge. It looked rather like a tubular cast-on, and having done a little bit of trial and error with various methods, I'm now 99% sure that it's the Italian Cast-On with Tubular Set-Up demonstrated in this video tutorial on Liat Gat's KnitFreedom blog. Here's my test version, which is a little fuzzy, but I think you'll find it has pretty much exactly the same appearance:

image

When I went to count the body stitches, I noted that the cast-on edge also had a tell-tale little two-stitch patch of stockinette in the reverse-stockinette rows immediately above the cast-on (probably right at the start of the round). It's not mirrored on the other side of the hem, nor on the cuffs of the sleeves; such asymmetry definitely conveys a handmade feel, as if the knitter was just learning how to use this cast-on method, or perhaps wanted to visually mark the midpoint or beginning of the round.

image

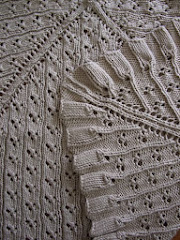
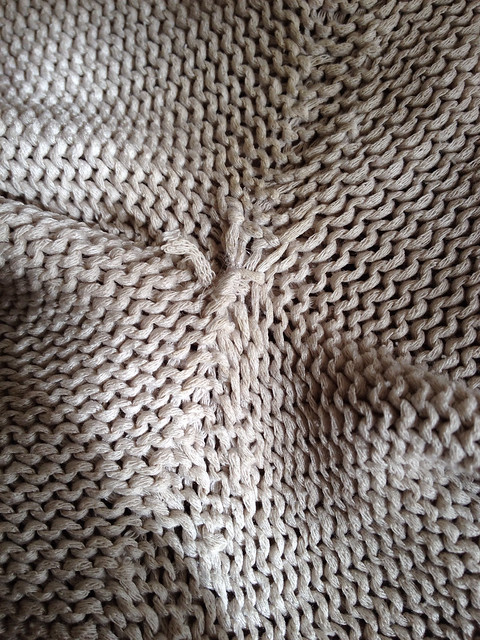
Clue number two: The shaping. Waist shaping on this garment consists of mirrored decreases worked two stitches away from either side of the start and midpoint of the round (as ssk, k4, k2tog).

image

The seamless construction of the body and decreases of this kind aren't unheard-of in machine-knitting, but when it came to the increases, things got interesting...

image

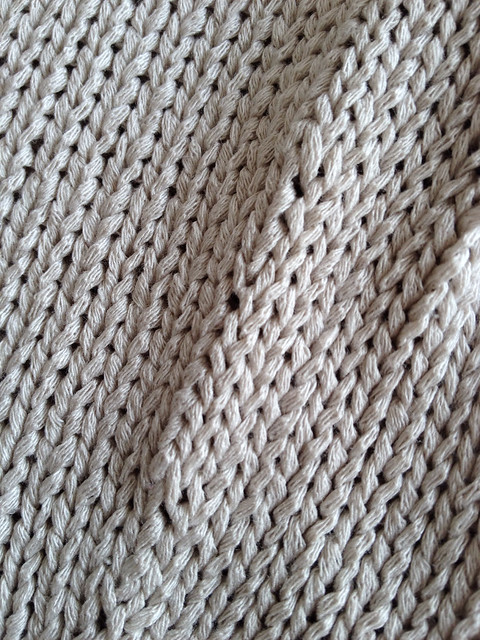
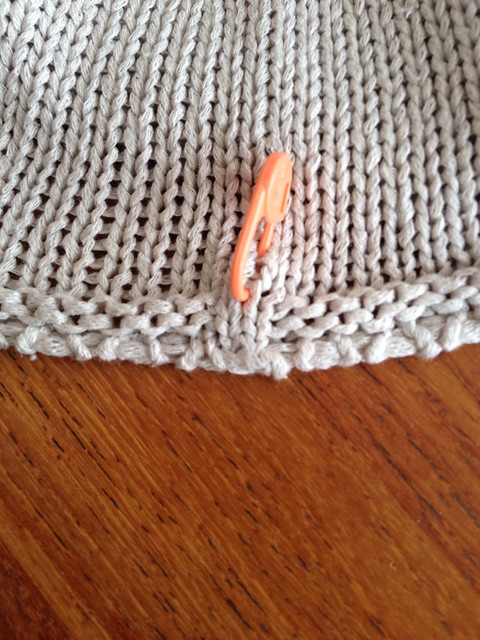
These, my friends, are LIFTED increases--made by picking up the bar between stitches and working it through the back loop. I don't think I've ever seen such an increase in a machine-knitted garment, and it struck me as another distinctly handmade element. The same increases are used in shaping the sleeves, which are also knit in the round with no seam--a further indication of hand-knitting.

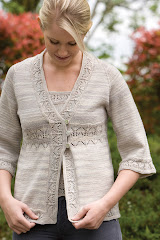
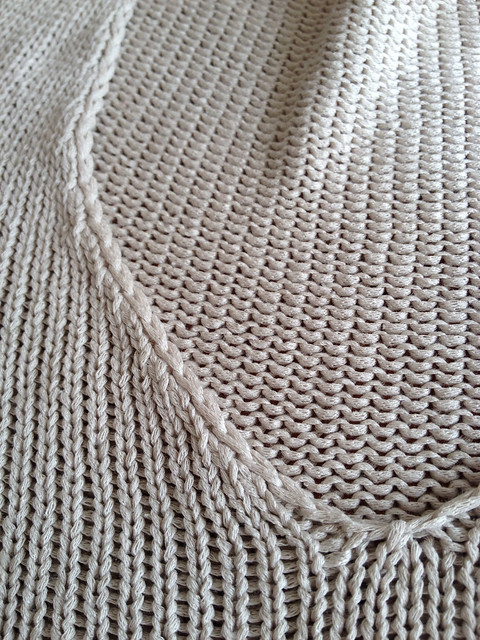
Moving on, there's the neckline. The front and back of the sweater consist of an equal, and even, number of stitches (164 at cast-on, to be exact, or 82 each for front and back).  It looks to me like the shaping for the neckline begins five rows after the sleeves are joined, and was worked as follows:

Set-up to begin working back and forth: k39, k2tog; then turn and sl first st, p to last 2 sts, p2tog. Turn and sl first st, k (with sleeve shaping) to end; turn and sl first st, p to end.

Thereafter: Turn and sl first st, k2tog, k (with sleeve shaping) to last 3 sts, ssk, k1; turn and sl first st, p to end. (Shaping worked on RS rows on both left and right edges of neckline.)

Does it look that way to you, too?

image

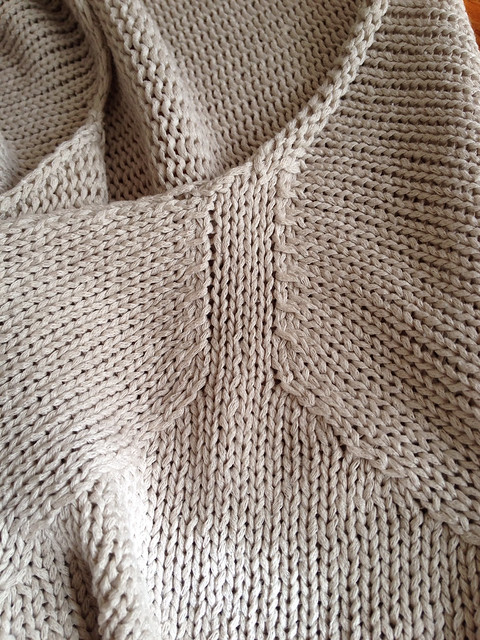
Next there's the shaping where the sleeve is joined to the body and the sleeve cap and underarm shaping are all done seamlessly. These look handmade to me too, for sure.

image

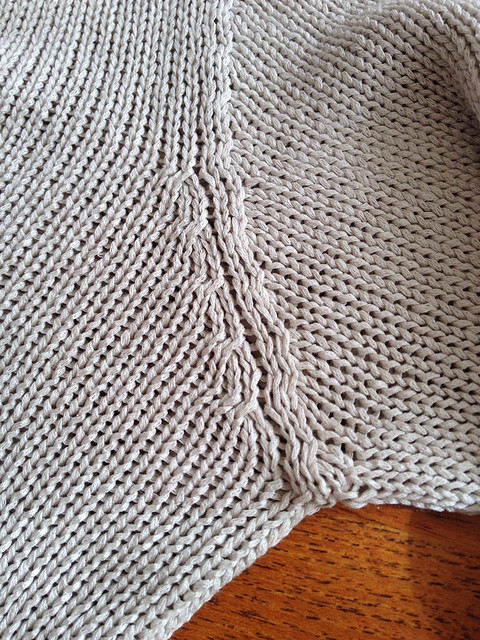
Ditto for the narrow, four-stitch shoulder saddle and associated shaping.

image

Clue number three: The finishing. Here's where the case for handwork is somewhat less definitive in my mind. Even though the whole point of seamless construction is to minimize finishing, you're always going to have a few ends to weave in--not just from the cast-on edges, but also where the sleeves are joined to the body, and wherever you join a new ball or skein of yarn. The way someone weaves in their ends is highly personal, too, so I was really expecting this to be a clincher. (I can't tell you how many discussions I've had in knitting circles about people's preferred methods, time-saving tricks, or confessions that "I just knot the ends together and trim them. If I had to weave everything in I'd never finish anything.") When I turned the garment inside-out to look, though, I found no joins whatsoever in the body--meaning over two square feet of fabric were knitted from a single, continuous length of yarn. Hmm! Unusual, but not impossible, if you have access to big skeins...

The ends at the underarm joins were really simply and unobtrusively finished, too--in fact, at first glance, I couldn't see how these short little ends were kept so tidy.

image

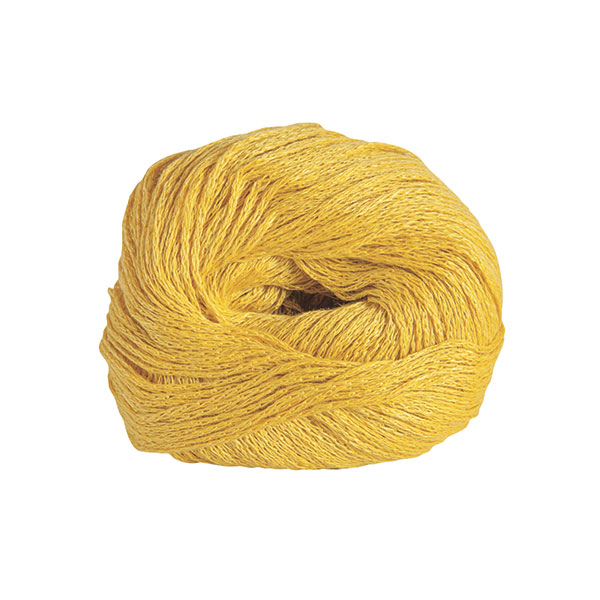
Let me digress for a minute here and talk about the yarn, which is probably significant enough to be designated Clue number four...and a very mystifying clue that is, too. A close look at the exposed end there in the underarm confirms that it has a chainette construction, not plied (although looking at the knitted fabric, I initially though that it was a plied yarn with a very low twist). It has a dry, crepe-like hand, and is knit at a pretty open gauge that gives it a nice fluid drape. I noticed in closeups that it has just the slightest tendency to pill in the way characteristic of cotton; however, it also has a little bit of sheen, which suggests either a synthetic or maybe a touch of silk. The dry hand certainly calls to mind that of a raw silk, but it doesn't have the squeak of a pure or high-silk-content blend. My best guess so far, without the aid of microscopy, is that it's a DK or light worsted-weight cotton-linen-viscose blend.

There are quite a few such blended-fiber chainette yarns on the market for handknitters--although the vast majority are sold in 50g put-ups, which would have required joins somewhere in the body for sure! Chainettes can't readily be spliced invisibly like plied yarns can, and neither can cellulosic fibers like cotton and linen, which don't felt. This garment was almost certainly made with three long strands (two for the sleeves, one jumbo-length one for the body), not of seven or eight 50g balls of something (I haven't yet weighed it, but I will--I'm guessing it's close to 400g). But then again, you can see in the fabric here and there an occasional little loop from a split strand--less likely in machine-knit fabric, but a regular occurrence for even the most meticulous handknitter. Hmmm again!

image

Back to the finishing question, though. Looking at the back neck edge to see what kind of bind-off and finishing technique was used there, I happened to see a wee filament sticking out around the yarn end. It was partly unravelled, so I carefully trimmed the loose portion (no, reader, I did NOT pull it! Tempting, but NO). It turned out to be some kind of transparent monofilament, which, upon close inspection, was wound around the ends at the cast-ons and underarms, too. (Look closely at the underarm seam image above, and you might be able to just make it out there.) Curiouser and curiouser!

image

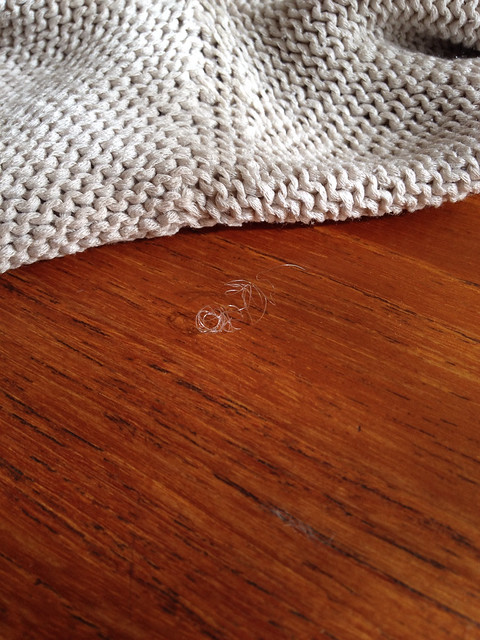
I have searched the Ravelry forums at some length, and the only people who are talking about monofilament seem to be weavers and spinners, not knitters. I don't personally know anyone who's using this as a finishing technique for ends, although it's certainly an effective one (those ends ARE nice and tidy!). It is an unusually soft and fine variety of monofilament--not stiff or scratchy like fishing line. It may be a specialty product, but it's not one I'm familiar with. This one little piece of the puzzle is the bit that makes me most perplexed about whether this is, in fact, an entirely handmade, one-of-a-kind garment, or a high-quality piece of manufactured goods, perhaps with a handknit component.

As with some of the cases I observed while doing fieldwork with CSIs for my dissertation, the forensic evidence is compelling, but not 100% conclusive. Some elements of mystery remain here; perhaps someone out there has answers. Knitters, do you know anyone who uses monofilament to finish ends in their handknits? Do you recognize this yarn? Did you (or some knitter you know) make this garment and then donate it to a thrift shop in southern California...or give it to someone who would have? Have you perhaps seen an identical garment on the rack in some high-end boutique somewhere? Write and let me know!

If this WAS something you (or a knitter you know) made, you might be happy to hear that it is now T.'s favorite sweater--she said she's been wearing it pretty much nonstop since finding it in that thrift shop. So, I'll be working on a reverse-engineered copy of this simple but beautiful garment for when she wears the original out. Stay tuned for a post on that project in 2015, and in the meantime, have a great holiday season!

Monday, June 30, 2014

Four-letter word, starts with Y

Yarn labyrinth

The summer solstice was last Saturday, June 21, and with it came the start of the summer challenge at my LYS...Local Yoga Studio, that is. The studio I go to does these challenges twice a year; whether or not I make the goal, I always learn something from them.

In that way, and many others, a yoga practice has so much in common with knitting. It can be loose or structured, fancy or simple, but however lengthy or involved the finished project, when you pull it all apart you can see that it's got just a single thread running through it. Breath is the yarn of yoga--there is no in without an out, no knit without a purl, and the little spaces between them are as important as the stitches and breaths themselves. They can be smooth and even, or loose and raggedy, but each stitch builds from and connects to the other as one breath follows another. The most intricate-looking contortions turn out to come easily when you perform them one step at a time--and this sometimes happens on the very same day that just lying flat and still poses the hugest challenge. In some yoga poses, or asanas, we are encouraged to look at an imaginary point somewhere far beyond our fingertips; likewise, when we cast on, we're gazing a thousand yards away to the finished project that the stitches we're creating will become. Take a look at pictures of FOs from a knitalong, and it's like seeing students in a yoga class--everyone makes their own unique expression of the pose or the pattern, with color, proportion and modifications in infinite combinations. I love the people I do these things with, too; they understand me in a way that other people never will, because we speak a common language, use the same special tools, and encourage one another to create things of beauty.

As with any practice that has a meditative element, I find the time I spend knitting or doing yoga on a daily basis actually creates space and freedom in my life. On Monday, one of my teachers shared a version of a passage from the Tao Te Ching that echoed this: "Water nourishes everything, and competes with nothing." Getting up a little early (OK, sometimes it feels VERY early) to attend a 7:00 AM community flow class means I get to work earlier than usual, and in a better mood, because I've already accomplished something by 8:00 besides rolling over and kicking the cat off the bed. Knitting lets me feel like my quiet time is productive, but it's also a way I can challenge myself mentally and take real joy in the process. It's a space where I can fail and still love myself; where I can try and try until I get it right; where I've acquired tremendous skill and fearlessness bit by bit. These minutes aren't spent, they're invested.

The goal of this summer's challenge is to attend no less than 25 yoga classes in the next 30 days...a pretty tall order, especially since I'm going to be out of town for several days during that time frame. So far so good, though: I've logged eight classes in the first five days, so I can even be lazy and skip a day. Like I said before, though, even if I don't make the goal, I know I'll get something out of this; I always have. Summer 2011, when I moved back to LA and started attending classes at this studio, was my first challenge; that was also my first year of being able to touch my toes, after 30 years of tight hamstrings. I was so excited about it, I would bend down and touch my toes for no reason--just because I finally could! Summer 2012, I added headstands in the middle of the room to my practice. That winter, though, I really struggled to make it in to the studio at all. I had a new job, and couldn't seem to get myself to classes on time, even though I WANTED to be there and make room in my life for a consistent practice. I realized I had to just do something differently, and that's when I first tried getting up early for that 7:00 AM class. This week, I've gotten up early three days in a row, and I'm going for five. Maybe even six...

But now that I'm near the end of this post, I realize I may already have gotten my Big Lesson from the challenge this time around. The last time I did a big clean-up in my office at home, the part that really stressed me out and pushed me over the edge into tears was sorting through the many half-finished and sketched-and-swatched-and-started-then-frogged projects that had accumulated here and there over the months. At the time, I could only see them as failures. I thought I should have been clever or disciplined or committed enough to realize my visions, and was disappointed at this evidence that, most of the time, I hadn't. All those false starts got jumbled together in my mind with my unfinished dissertation and all the other overdue-for-no-good-reason projects that tortured and shamed me. I went looking for that box of swatches this weekend, though, just after the start of the challenge. Now, I find I can see them as worthy efforts; variously, they were experiments, riffs, ends in themselves, twists in the labyrinth. They're where I've fallen seven times, and stood up eight. I could probably do 25 of them in 30 days, too.

Thursday, June 26, 2014

Summer here

Last week was a busy one. On the 18th, Knit Picks launched a new yarn line called Lindy Chain, and along with it, a new design of mine that's just the thing for summer knitting: the Beryl sleeveless top!
CIMG3299
Click on the image for pattern and yarn purchase info!


Lindy Chain is a fingering-weight linen and pima cotton blend, which made it a new fiber experience for me--I've never worked with linen or linen-blend yarns before, although I've had a big hank of laceweight linen in a very exciting grassy-lime green shade in my stash since a yarn swap a few years back. I've always been a little hesitant to use that hank, honestly, since I've heard linen can be really hard on your hands and wrists, and stiff and scratchy and prone to tangling and generally unpleasant to be around until after it's blocked. I have friends who swear by linen-cotton blends for things like washcloths and dishcloths, since it responds really well to hard use, getting softer and softer, but I've never actually made a dishcloth, so...me and linen have so far failed to mix.

The thing that made me eager to try Lindy Chain, though, was that it's a chainette construction; that is, instead of having two or more finer strands twisted together (or plied, to use the technical term), the yarn consists of thread-fine strands that are knitted together, like a very, very fine i-cord. You can actually see the little V's of the chain in this close-up image of the rich golden Honey colorway:

http://www.knitpicks.com/yarns/Lindy_Chain___D5420254.html
 
Nifty, huh? There aren't a lot of chainette yarns out there, and most of the ones that you can get are novelty yarns (another category I've used very seldom so far in my knitting life). However, one of my all-time favorite yarns, Rowan Calmer, is a chainette, and I've always loved its special qualities--stretchy but not droopy, with great stitch definition, and really forgiving on the needles. It also made perfect sense to me that if anything could tame the linen beast, it would be a chain.

So now I've tried Lindy, and I definitely see why people LOVE linen. The finished fabric was a little rough before washing and blocking (my contact at Knit Picks used the word "rustic," which I think is perfect), but I noticed it softening even as I worked with it--the bottom of the garment already had a more hospitable hand than the top by the time I had about 7 or 8 inches worked, so just the action of moving the fabric around as I knitted was clearly limbering it up. The next time I work with it, I'll probably try bamboo needles or something with a blunter tip. Usually I'm all about laser-sharp needle points when I knit; like many knitters, though, I found the linen fibers to be a bit splitty, which a rounder needle tip will mitigate. But man, talk about cool and drapey! The finished fabric was soft enough to wear next to the skin, and I've NEVER been so comfy wearing a handknit garment in the summertime. I can easily see remaking a lot of my sock-yarn designs in Lindy Chain for spring/summer/early fall wear here in California. The Cecily Twinset, for instance, would look great in any of the 20 nature-inspired colors this yarn comes in. I'm partial to Bluebell, but Conch and Celery and Linen are all pretty, too...

Thursday, June 5, 2014

Did I mention I went to Amsterdam?

Because I totally did! It was great, not least because of the fiber-craft scene there, which is small but vibrant. The impetus for this trip was the Orphan Film Symposium, which was being held overseas for the first time, at the EYE Film Institute, housed in a spectacular new building overlooking the Amsterdam waterfront. But I found plenty of ways to intertwine this trip with yarns, fabric, buttons, and knitting, of course!

More treasures from the Katten KabinetAs some of you may know, when I'm not knitting, I'm an audiovisual archivist. My specialty is the preservation of home movies and amateur film, and researching how those media have been integrated into our larger cultural heritage over the decades since their introduction. I'm a co-founder of the international Home Movie Day event and the nonprofit Center for Home Movies; my Billington Bag pattern is named for the current Librarian of Congress, and proceeds from sales benefit CHM and their efforts to preserve and provide access to amateur films from all over the world.

While these two sides of my identity may seem distinct, they're quite closely related. Home movies and handknits have lots in common: First off, there's the fact that they are both made of yards and yards of long skinny stuff, and they both have lots and lots of little tiny holes in them. They are also deeply personal, and highly reflective of the time and place they were made, not to mention the people who made them. They're often far more colorful than their mass-produced counterparts, and of course they're totally unique. With careful preservation, they can last for many years in pristine condition, but even when they're worn almost to tatters, they're still special.

It shouldn't come as a surprise, therefore, to hear that I wasn't the only person in the audience knitting my way through this symposium! One of my cherished colleagues, Catherine, had a lovely beaded shawl project going, and she was clicking away softly in the dark next to me while I worked on a baby blanket for my friends' son-in-progress. There was definitely at least one sock project in the works in that auditorium, too, but I didn't get a chance to ask the knitter about it--the program was jam-packed, as always, with amazing new discoveries, preservation premieres, rarities and one-of-a-kind productions, and there was hardly time to breathe during the meal breaks, let alone wolf down a delicious plateful of Indonesian food, before heading back into the theater for more screenings and talks.

Under the circumstances, I was truly glad that I'd built a couple of extra days into the trip earlier in the week--mostly to stave off jetlag, but also to ensure that I  had time to meet with my counterparts in the Presentation and Preservation of the Moving Image master's program at the University of Amsterdam...and to go yarn shopping, of course! Catherine was kind enough to show me the highlights of her city, and through her I met some truly lovely fellow-knitters. The night I arrived, I joined her at the Thursday-evening knit night hosted by charming LYS Penelope. Everyone there was lovely, wearing lovely things they'd knitted themselves, and they were all very much knitters after my own heart. Someone even baked a rhubarb cake to share with us, which was divine. (Since coming back, I've made that recipe twice...yum!)

On the weekend, Catherine and I met up again to make the rounds of fabric, yarn, and button shops all over town via bike. The bicycle is the dominant form of life in Amsterdam, and the whole city is way more navigable on two wheels than four--a major, albeit very pleasant, change from auto-centric Los Angeles. I swear, I haven't ridden bikes with friends this much since I was ten years old! Although the cargo capacity of a rented three-speed cruiser (not to mention the ever-tighter restrictions on free checked baggage for international flights) puts a natural cap on shopping, and on the whole I was pretty restrained, I did manage to bring home a lovely haul. Behold!

image

One of our first stops was at A. Boeken, a stoffen and fournituren (fabric and notions) shop on Nieuwe Hoogstraat recommended by a lovely Raveler  in the Stitch 'n Bitch Amsterdam group (thanks for the tip, briocher!). Like many places in ancient, canal-crossed Amsterdam, this shop is taller than it is wide, but packed to the rafters with lovely things. I got several yards of re-embroidered lace and a dead classy three-season tweed in a color blend that's part charcoal, part coffee. Then we hit De Afstap on Oude Leliestraat, which has one of the best selections of Rowan yarns I've seen in a long time. Their prices were either really reasonable, or else I was doing the Euros-to-dollars math wrong; regardless, I scored some Rowan Fine Lace in a dusky violet and their last four balls of Regia 4-fadig in a pale silvery lavender color (which will go great with the browny tweed, whatever that becomes). We rounded out the expedition with a wander through the Albert Cuyp market, which has a handful of fabric shops, each with its own specialty: quilting cottons, decor, fashion fabrics, couture textiles, imported batiks. Finally, we browsed respectfully through the collection at the Knopenwinkel button shop, got some chocolate, and called it a day.

While I chose to leave the Anne Frank House for my next visit, I didn't neglect the great cultural treasures of the city. I made a dutiful pilgrimage to the Rijksmuseum and joined the massive crowds contemplating the equally-massive Rembrandt group portraits (but really preferred their decorative arts collection, which had some amazeballs cabinets inlaid with ivory and mother-of-pearl, and a surprisingly touching display of woolen hats found in the graves of ancient whalers).  Thanks to my Lonely Planet pocket guide, I also found my way to the Katten Kabinet, or Cat Museum! This is a private collection housed in one of the lavish homes on the Golden Bend. It's quirky, to say the least, and as you might imagine, yarn and cats playing with yarn are frequent motifs in the works on display here!

More treasures from the Katten Kabinet

There was one 17th-century genre painting of a cat with its paw caught in a steel trap, which was awfully disturbing, but the little bronze statuette of a cat pooping ("Poepende Kat" (1989) by Monica Rotgans) may well be my favorite piece of art ever.

Every Dutch native I talked to there said the weather was unseasonably fine that week; I have no basis for comparison, this being my first trip to the country, let alone the city, but the sunshine and budding trees were indisputably pretty.

image

So, too, were the myriad architectural details of this old-world city: Antique tiles and delicate stonework abound there. You will miss a lot if you have to spend all your time there looking out for speeding bicycles, so be sure to take plenty of breaks for beers by the canal and people-watching if you go there yourself. And keep an eye out for me, too; I'm definitely going back at my earliest opportunity!

image


Thursday, May 29, 2014

Just released (finally!): Irma!

This is one of those designs that's been ALMOST ready to go for longer than I care to even think about. It's been waiting for those last few tweaks (pesky things like double-checking measurements and making schematics, which are my two least favorite parts of the technical editing process) for months and months and months on end. It's not all wasted time; in those same months, I've been field-testing (a.k.a. wearing all the time) the original prototypes, and have had a couple of friends test-knitting the original, non-schematic-ed, non-double-checked drafts and alerting me to minor errors and typos. And fortunately, the original photo shoot was done right around the same time of year as this, so maybe no one will look closely and see how many more crow's feet I have now. Without further ado, I give you... Irma!

CIMG2877


I attended a workshop with Deborah Newton at Vogue Knitting Live in LA a few years ago, which was well worth the price of admission. The fee included a copy of her then-new book Finishing School: A Master Class for Knitters, a welcome addition to my reference shelf, and Newton's own expertise and advice were invaluable! One of the many things I learned that week was that every knitter--young and old, experienced and novice--has their very own set of strongly held opinions about knitting, yarn, and everything associated with them. Deborah Newton, for instance, has near-religious convictions regarding seams in knitted garments--she's a big, big, big fan of 'em. In fact, she was so compelling on the subject of seams that I thought I'd go ahead and try designing a pieced-and-seamed cardigan myself, and Irma is it!

The Irma cardigan is a slightly airier, more feminine (if I can be gender-normative for a minute here) take on the shawl-collar sweaters all the hipster boys have traded their hoodies for as they've hit their mature (ha ha) years. It's worked in an allover columnar lace motif with deep ribbing at the cuffs and hem. And pockets, of course! I worked the original prototype, which is the jade green one shown above, in Simply Socks Yarn Company's solid wool/nylon "house blend." SSYC Solid is a yarn I really adore, not least for its springy plied texture, but also because it comes in, like, EVERY COLOR EVER. I also reknit the pattern, once it was (mostly) written, in Knit Picks Gloss Fingering in a dark gray color called Hawk. That yarn has a hint more luster and slightly crisper stitch definition, and makes the lace motif really pop. It also has an elegant drape in stockinette, thanks to its 30% silk blend, which helps the shawl collar roll while the button band lies splendidly flat, and that's why this yarn is another favorite of mine. (Yes, I have about forty-eleven different "favorite" yarns. Who doesn't?) Were I to make yet another one of these for myself--and I'm not ruling that out--I'd probably try a super-cozy and decadent winter version in Knit Picks Capretta, maybe in the Pesto colorway. But then, I'm a sucker for cashmere.

On the whole, I liked the seamed-garment experience. I learned to sew before I learned to knit, so on a fundamental level, the concept of taking flat pieces and building a garment out of them makes every bit as much sense to me as taking a strand of fiber and building it, stitch by stitch, row by row, into a shape that fits a body (or a hand, or a foot,  or what have you). For Irma, I used the crocheted-seam technique Newton demonstrated at the workshop and describes in her book; it was really fun to work, and I think I'll probably continue to use it for shoulder seams in preference to a three-needle bind-off. For one thing, it's easier to unwork and rework if you need to (if you've ever dismantled a thrift-shop sweater to recycle the yarn, you've probably already unworked a crocheted seam!). It also adds a skosh more structure to one part of a garment that really needs reinforcing, while still being flexible and elastic. And because it does use rather more yarn than a mattress-stitch seam or three-needle bind-off, you can even cannibalize it in a pinch if you need a foot or two of yarn to darn or patch a very well-worn garment. Unlike reserved leftover yarn, yarn transplanted from a seam will match the repaired area perfectly, since it's been laundered the same amount as the rest of the garment--so it's kind of a rainy-day account for your sweater! Which is good, because now that other people can actually knit this design for themselves, I'm halfway to wearing the prototpyes out.

Friday, May 2, 2014

Taking it down a notch

Sometimes you want a challenge; other times you just want things to be easy, and successful, and foolproof, and DONE. A Raveler posted a really good question recently on the pattern page for the Billington Bag:

Am I really the only one struggling to sew the darn lining? Maybe my interfacing is too stiff, but trying to fit the sides together is a nightmare. Rethinking the pattern to see if I can find a way to make the lining easier to sew.

You know what? I totally get it. The instructions for this design call for a pieced lining, where each of the four vertical sides is measured, shaped, and cut to conform really closely to the shape of the finished, felted bag.


Along with a good stiff interfacing, this pieced lining helps give the bag enough structure to stand open on its own, and prevents things like your car keys and cell phone from getting lost in folds of loose fabric. But it's a fussy process to sew corners and angles and seams on both sides of narrow strips of interfaced fabric, and dagnabit, there's just gotta be an easier way that gives ALMOST the same results, right? I think so--and here it is.

Instead of doing a pieced lining for the Billington Bag, knitters who want a shortcut to the finish line can try a modified sack lining. Three measurements, two pieces of fabric and matching interfacing, five seams (three of which are completely straight!), and you'll be ready to insert it.

Step 1: Measure.

Take your felted bag and flatten it out as shown below--so the top edges are even and the bottom of the bag is folded more or less in half along its long axis. Measure the width at the top of the bag (A), the width at the bottom of the bag (B), and the height from the top opening edge to the folded bottom edge (C).


Step 2: Cut.

Cut two rectangles of interfacing that measure B x C. Cut two rectangles of lining fabric that measure (B + 1") x (C + 1"). Center the interfacing on the lining fabric; you'll have 1/2" margins all the way around. Baste or tack interfacing in place on the wrong side of the fabric.

Step 3: Sew.

With right sides of fabric together, seam the two sides and the bottom closed, leaving the top open, like a pillowcase.

Subtract A from B; divide the remainder by 2, and mark a point that far in from the side of the interfacing on the top edge. (For instance, if your bottom width (B) is 14" and  top width (A) is 11", 14 - 11 = 3.  3 divided by 2 = 1.5, so you'll mark 1.5" in from the upper edge on both sides of the top.

If you're making the short version of the bag, fold it horizontally in thirds, and mark 1/3 of the way down on each side. Stitch a diagonal line from 1/3 down the side to the marked point on the upper edge, and trim away the excess, leaving 1/2" of lining fabric and trimming the interfacing very close to the stitching (1/8" or so). If you're making the tall version, do the same thing, but mark and stitch 1/4 of the way down the sides, instead of 1/3.

Now comes the tricky part (don't worry, it's not that tricky): Making the bottom of the lining flat! To do this, just put your hand inside the sack, down into one of the corners. Bring the side seam and the bottom seam together, pinching the corner flat. Sew straight across the flattened corner at the point where it's as wide as the inside bottom of your bag; repeat on the second side. (This is the same principle at work in paper grocery bags, so if you get lost and these caveman-level illustrations of mine are no help, take a look at the bottom of one of those!)
Step 4: Finish.

Tuck the triangular points under the bottom and tack in place, if you like (or just press them with under gently with an iron). Turn the upper edge of the lining fabric over the interfacing, insert the lining, and stitch to the upper edge of the bag. Done!

Monday, December 30, 2013

Tillie baby blanket

What do you know? It's baby season again. A colleague just announced her pregnancy, and I have two other friends with a bun in the proverbial oven now. Time to fire up the ol' baby-knitting engine and get some gifts in the works before the showers hit!

Luckily, I just finished writing up a pattern from the LAST baby avalanche I went through, in which a bunch of the expectant parents opted to find out the baby's gender on the day of delivery. While I totally respect the decision--and even admire it, as I wouldn't have the willpower to resist finding out--it does throw a bit of a wrench in the works when it comes to almost any kind of baby gift. I am seeing that there is NOT a lot of gender-neutral stuff out there past the plain white onesie. Even the items that come in yellow or pale green (which are apparently, and respectively, the classic and contemporary code colors for gender-nonspecific baby gear) tend to have some coded gender references. You know, ladybugs or lizards, that kind of shit.

Knitting patterns aren't much better, although the silhouettes are at least more non-aligned. Where you hit the wall with those is in the baby-yarns section of the LYS, which just looks like Tinkerbell's toilet to me. LOTTA pastels on that wall, folks. Don't babies need basic black and classic navy too? Or, you know, teal and tangerine and deep, rich earth tones?

If anyone knows a better way to style a baby blanket than draping it on a chair, please tell me.

I'm not saying I've totally solved these problems, but along with the Peabey Bear stuffed animal (which is nice because it's soft and baby-safe, especially if you knit it up in and stuff it with organic cotton) the Tillie Blanket pattern is my stab at it. It's got a bit of eyelet texture, so it's not so boring to knit, and there's a subtle flounce at the edge, yet the overall effect is not so lacy and ruffly as to be categorically girly-girly. It works just as well in blue or pink as it would in yellow or soft green; I opted for a nice sandy neutral, which should go with pretty much anything (but coordinates especially well with burp stains). It's worked up in an easy-care sport-weight yarn that comes in a wide range of colors--including a fabulous tangerine orange, rich red, chocolate-y brown, and yes, basic black, if the baby in question has a daring fashion sense or artsy parents who would go for that. No more waiting 'till the baby comes out to cast on and start knitting!